As a Global Administrator, you can connect Cash Management to your ERP, general ledger (GL), or bank through Data Integration. This setup allows transaction data to be imported automatically, eliminating the need for manual flat file uploads and ensuring that reconciliations always reflect the most current financial information. For more information about Data Integration, refer to the Data Integration Help.
By defining Data Source and adding Transaction Sets, you establish the connection points that users rely on when running reconciliation tasks. Once configured, these settings enable users to import transactions, perform automated matching, and view validation results directly within the reconciliation process.
What you need to do
-
In Prophix Data Integration, create two sites for the job. For details on creating jobs in Data Integration, refer to Data Integration Help.
-
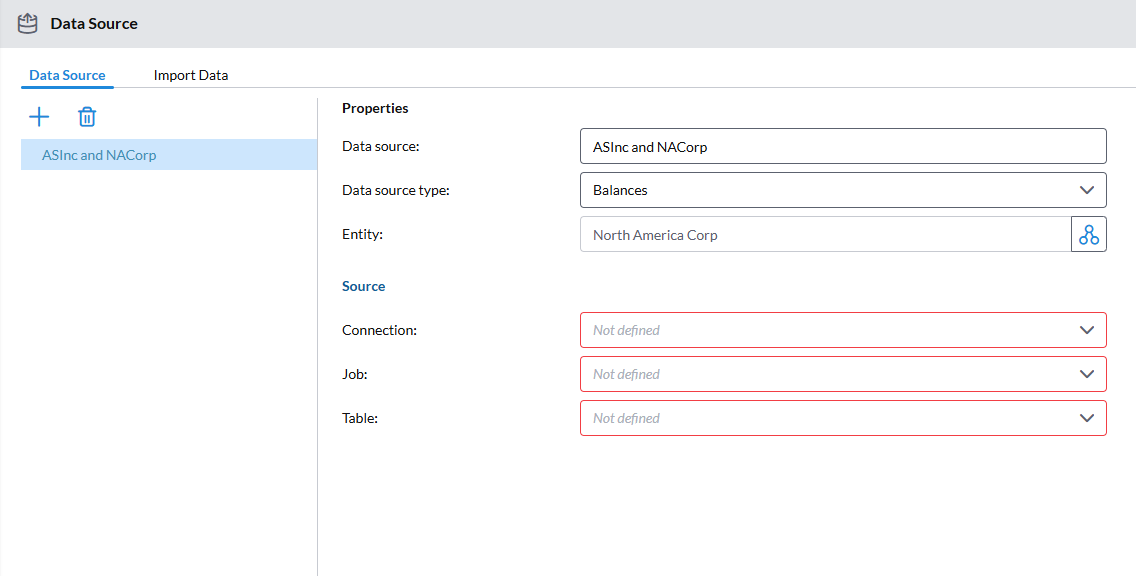
Define the Data Source — Identify and configure the connection to your ERP, GL, or bank in the Account Reconciliation application.
-
Add the Transaction Sets — Specify the data groupings to be used for importing and matching transactions in the Account Reconciliation application.
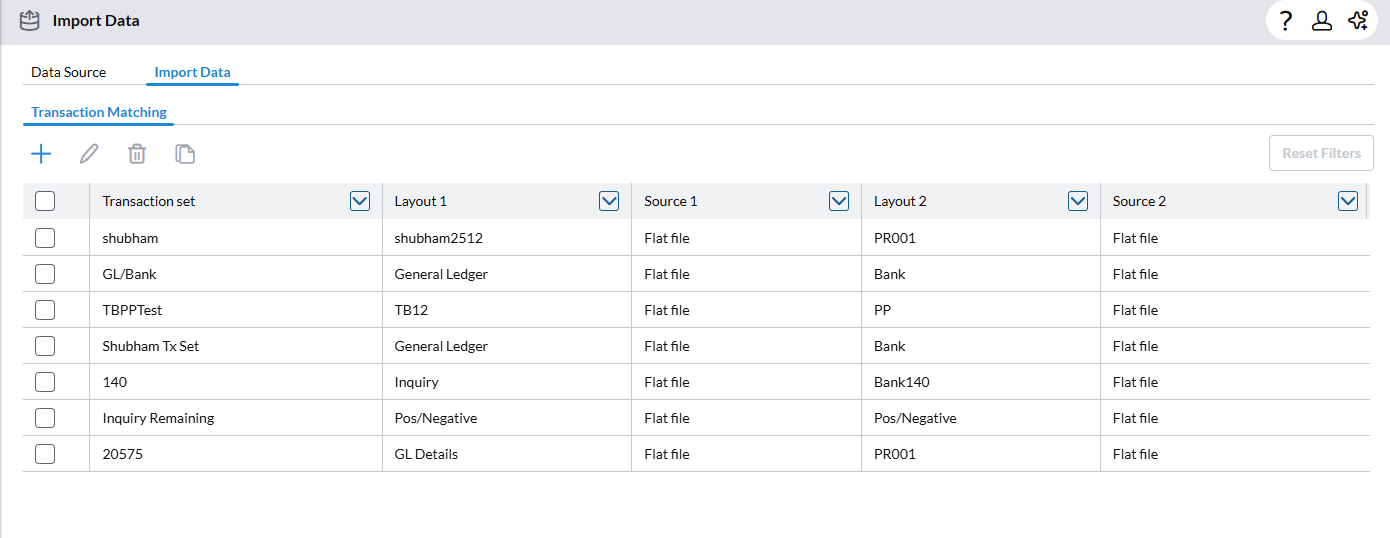
Define the data source
To perform transaction matching using data imported from Data Integration, you must set up two separate data sources — for example, one for bank transactions and another for general ledger balances.
-
Go to
 .
. 
-
On the
 page, click
  to add a data source.
 -
In the Properties panel, provide the following information:
-
Data source: Source of the data you want to import , for example, Bank.
-
Data source type: Select Transaction Matching.
-
Entity: Entity into which the data will be imported. Click
 to open the Select Entities dialog and choose the entities you want. You can select one or more entities for the import.
When an entity is selected, it is removed from the Number of Entities panel (left) to the Selected Entities panel (right).
-
Click
 to return to the previous page.
-
-
-
In the Source section, provide the details that identify the origin or location from which the data will be retrieved. The information in this section is based on the configuration defined in Data Integration.
-
Connection: Defines where the source is located.
-
Job: The process that will run and actually extract the data from the source. Jobs are configured in Data Integration.
As a global administrator, you can click to access Data Integration to create and make changes to jobs. For more information about Data Integration, refer to the Data Integration Help.
 -
Table: The database where the extracted data will be stored in the Prophix staging.
-
-
Save the defined data source.
-
Define and save the second data source.
-
Proceed to Add a transaction set.
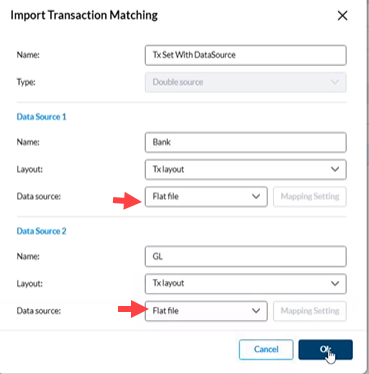
Add a transaction set
-
While on the Data Source page, click Import Data .The Import Data page opens.

-
Under Transaction Matching, click
to open the Import Transaction Matching dialog. -
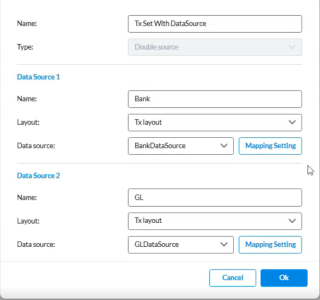
Enter the Name for the transaction set and then choose a Type
-
The Type is prefilled as Double source which will require you to provide information for two data sources.
-
For Data Source1 and 2:
-
Enter a Name (for example, GL, Bank, etc.).
-
In the Layout field, select the transaction matching type layout.
-
In the Data source field, select the applicable data source that you created in Define the data source.
-
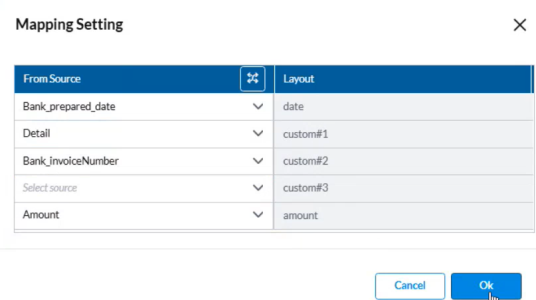
Click Mapping setting.In the Mapping Settings, you define how fields from the Data Integration source align with the layout fields in Account Reconciliation.
-
The fields from the layout appear on one side, and the columns from the data source appear on the other. Each layout field must be mapped to its corresponding source column (for example, mapping the “Date” field in the layout to the “Date” column in the data source) to ensure accurate data import.
Tip: You can also use Auto match
 to compare the columns from the data source with the fields in the layout and automatically link those with the closest matching names. For example, it can automatically match fields such as Date and Amount, but any fields without a close match remain unmapped. You will need to map those fields manually.
-
-
-
Save the transaction set.
Tip:Yo can now proceed to:
-
Assign the transaction set to an account. See Set accounts for transaction matching in the Set up transaction matching for an account article.
-
Assign the task to a user. See Assign a TM workflow task to users in the Set up transaction matching for an account article.
-

Handle Data Source issues
If the configured Data source becomes temporarily unavailable, Global Admins can switch to an alternate data source so that users can continue their work.
For example, if the connected Data source experiences a backend issue that may take several days to resolve, users will be unable to import their transactions. In this case, the Global Admin can update the transaction set to use a flat file import method as an interim solution.
Once the setup is changed, users can upload their flat files manually, complete the reconciliation, and close their tasks. From the Reconciled or Unreconciled tabs, users can select Reimport from the  More options to open the Import Data page, where they can select and upload flat files for both the Primary ans Secondary sources.
When the original data source becomes available again, the Global Admin can revert the configuration back to the platform connection.