Account Reconciliation entails the process of aligning records with account statements sourced externally, such as from a bank. This involves reconciling accounts by comparing entries, addressing any discrepancies through the provision of supporting documentation, and making necessary adjustments.
Your user role determines your ability to take action on or edit a task, its supporting items, and adjustments. For detailed information about user roles and edit permissions for tasks, see Permissions for editing tasks, comments, and notes.
Access Account Reconciliation tasks
You can access tasks by either clicking  on the navigation menu or selecting a task from the Dashboard.
On the navigation menu, click to open the Account Reconciliation page.
Note: As a user (Preparer or Approver), you can only see the tasks that have been assigned to you. Administrators on the other hand, can see everyone’s tasks.
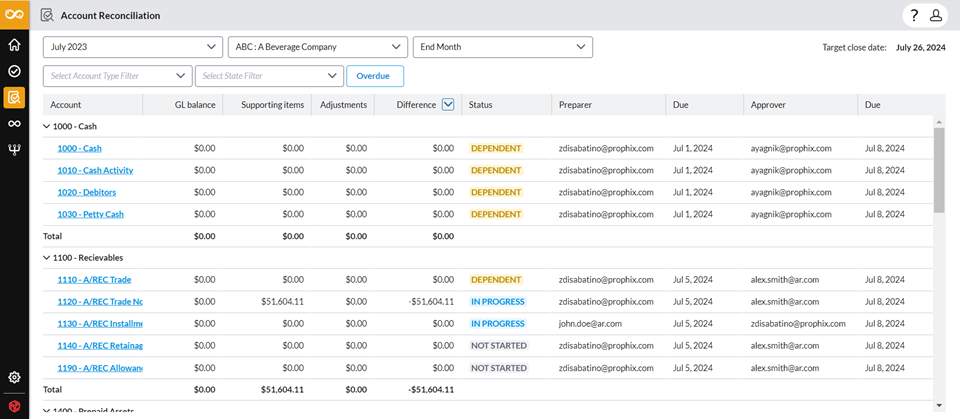
Tasks are sorted by Account Types such as Cash, Receivables, Prepaid Expenses. These groupings may correspond to balance sheet sections, or any custom grouping as defined by the user.
The top of the page contains the workflow information: Close Period, Entity and Close Period Type and Target close date.
You can filter the tasks using any of these criteria.
The columns in the table below include the following:
-
Account: Code and name of the account.
-
GL Balance: General Ledger balance
-
Supporting Items: Aggregate of all supporting evidence provided by users to prove the accuracy of the GL Balance.
-
Adjustments:The total of adjustments made to reconcile the GL Balance.
-
Difference: The total of variances between the general ledger balance and the supporting items and adjustments.
-
Status can be one of the following:
- Not Started: Work has not started on the task.
-
In Progress: Task has been started but not completed.
-
Pending Approval: Preparer has submitted the task but it is yet to be approved by the Approver.
-
Completed: The task has been completed and approved.
- Preparer: User responsible for completing the tasks accurately and on time.
-
Due: Date by which the task should be completed by the Preparer.
-
Approver: User responsible for checking the work of the Preparer for completeness and accuracy.
-
Due: Date by which the Preparer’s work should be checked for accuracy and completeness by the Approver.
On the Account Reconciliation page, you can do the following:
Filter and sort account reconciliation tasks
Filter account reconciliation tasks using any of these criteria:
-
You can use the workflow information fields to filter the tasks displayed. The workflow information includes Close Period, Entity, and Close Period Type, that you can use as search criteria. For more information, see General close information section of the Dashboard article.
-
You can also filter account reconciliation tasks by Account Type, State Filter; and Overdue tasks:
Account Type: Select an account type to display tasks that belong to that specific group. For example, Cash, Equity, etc.
State: Select one or a combination of these states: Not Started, In Progress, Pending Approval, Completed.
Overdue: Click Overdue to display the tasks that were not completed before their close due dates.
You can use these filters independently or combined. For example, to display only those tasks that have not yet been started and overdue, choose NOT STARTED and then, click Overdue.
-
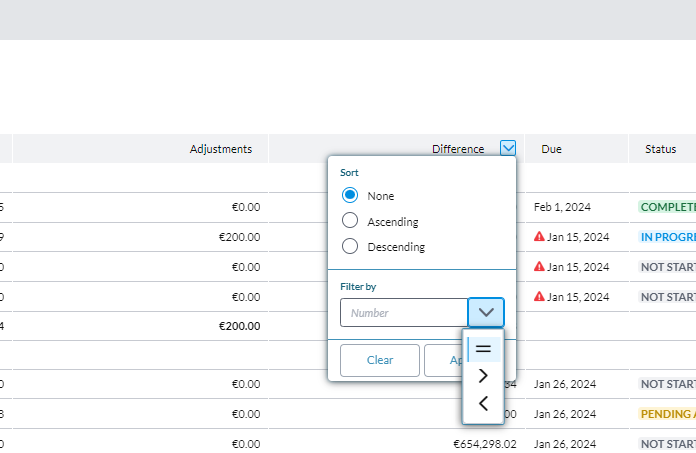
Account reconciliation tasks can also be filtered by Difference:
-
Sort the list of accounts in an Ascending or Descending order. The default is None — no particular order
-
Filter the list of accounts based on these operators: =, >, <. For example, to display accounts with differences below $1000, enter 1000 in the Number field, and select <.

Note: Remember to click
You can also filter tasks by Account, Preparer, and Approver. to apply the filter.
-
Sort account reconciliation tasks using any of these criteria:
-
Account
-
GL Balance
-
Supporting items
-
Adjustments
-
Difference
-
Preparer
-
Approver
-
Preparer Due
-
Approver Due
Reconcile an account
Here, you will add supporting items and make applicable adjustments to reconcile accounts that have unreconciled differences.
To reconcile an account:
-
On the Account Reconciliation page, select an account reconciliation task with a status of DEPENDENT, NOT STARTED or IN PROGRESS. The Account Reconciliation details page is displayed.
-
On the top left of the page are the Account name, the Entity to which the account belongs, the Close Period and the Status of the task.
For example, if you select a task from the list with a Status of Not Started to work on, the status changes to In Progress on this page.
-
The Details section (top part of the page) includes the names of the Preparer (logged-in user) and the Approver of the task, and the due dates. If the task is dependent on the completion of another task, the Predecessor task is displayed.
-
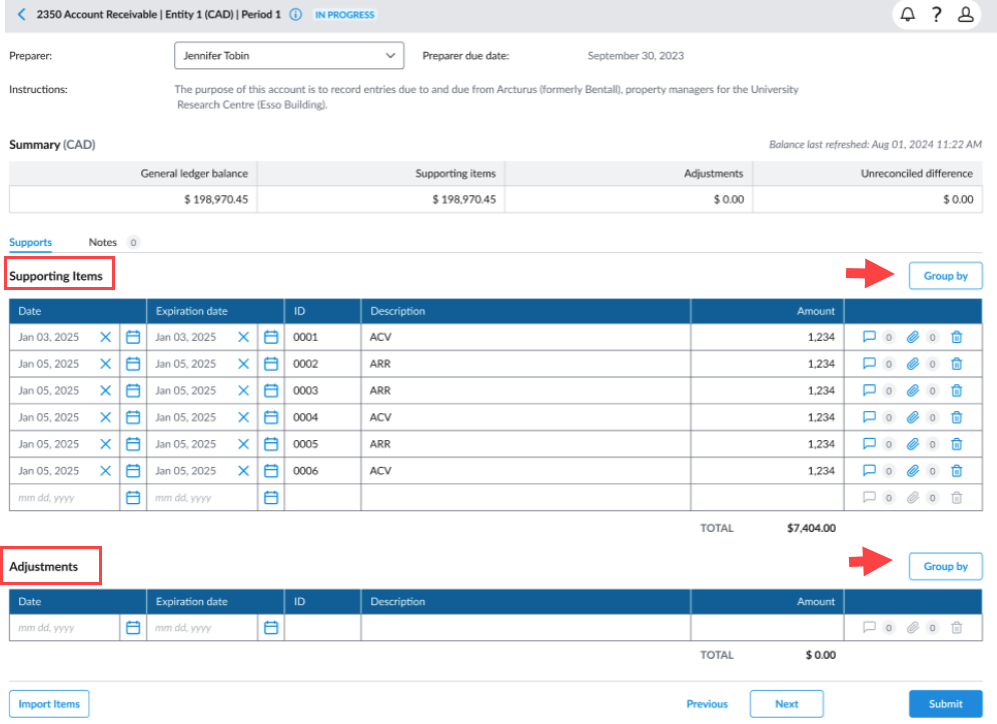
The Summary section shows the account currency (for example, EUR, USD), the General ledger balance, and amounts for the Supporting items, Adjustments, and Unreconciled difference. The Unreconciled difference is automatically updated as you reconcile transactions.
-
-
Do one of the following:
-
If you would like to reassign this task to another user, from the Preparer list, choose the user and click
 . See Re-assign a task for more information.
 -
To work on the task, proceed to the next step.
-
Now, you can proceed to:
-
Add or import supporting items to support the adjustments the figures.
-
Add or import adjustments to bring the accounts into alignment with expected balances.
Add a supporting item to a task
A supporting item is additional documentation or evidence that validates the accuracy of an account balance. It helps to validate that the recorded balance in the general ledger corresponds with the real transactions or external records (such as bank statements or invoices). For example, If reconciling a bank account, the supporting item could be the bank statement showing the actual transactions.
To provide a supporting item:
-
On the Accounts Reconciliation details page, click the Supports tab.
-
Go to the Supporting Items section
-
In the Date column, click
 and pick a date.
 -
In the Amount field, enter the amount. A system message confirms the addition of the supporting item /adjustment. and the Unreconciled difference is adjusted accordingly.
-
Enter the information required in the other fields on the page.
-
If there is an additional item to add, add it in the row below. Otherwise, leave blank.
-
Optionally, do any of the following:
-
Click
 to add a comment. You can input remarks or leave feedback about the task for the Approver. See Add a comment.
 -
Click
 to attach notes or upload a file. See Attach a file.
-
-
After you have reconciled the account with a supporting item, click
. A email notification is sent to the Approver in the workflow and the status of the task is updated to Pending Approval. Note: Once a task is submitted, you are prevented from making further edits.
-
Use the
 and
and  to navigate through your tasks.
Add a note to a supporting or adjustment item
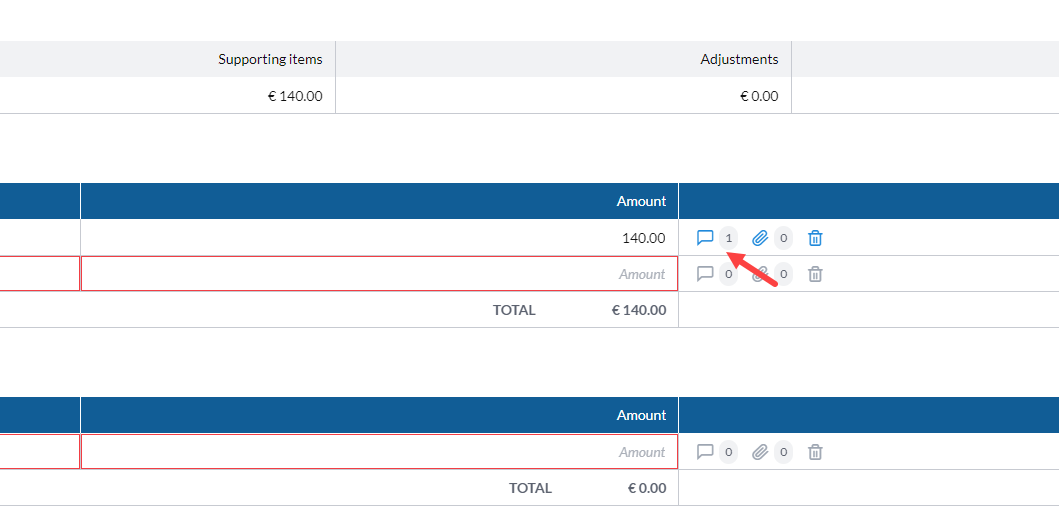
Adding a comment or file to an adjustment or supporting item helps you and the Approver communicate clearly and work together efficiently. It is a way to give more details about the adjustment or supporting item.
-
In the same row as the supporting item or adjustment, click
. -
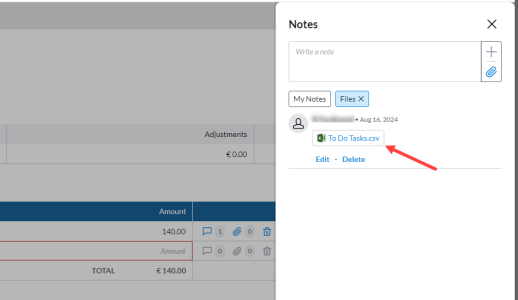
In the Notes pane, add a comment in the text box, and then, click
 to save it. Your comment is saved along with your name and date.
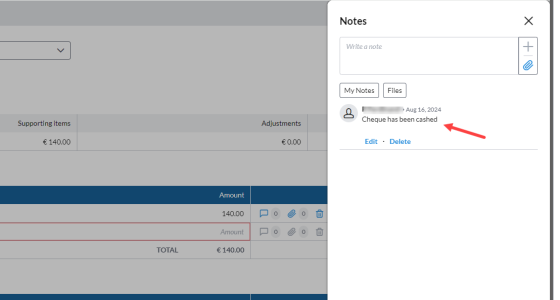
While adding comments, you can:
-
Edit the comments: Click Edit beneath the note. Update the notes and then, click
 to save the update.
 -
Delete the comments: Click Delete beneath the note or file. Confirm the deletion by clicking
 again.
-
-
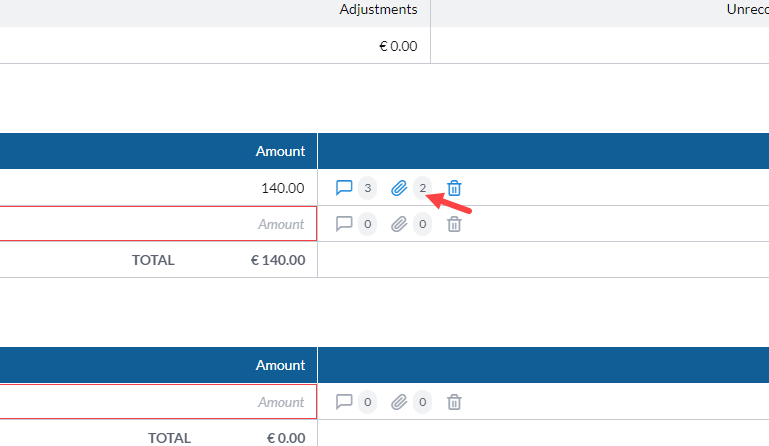
Exit the Notes pane. A number indicator appears next to the
icon, showing the number of notes or comments that have been added to the task.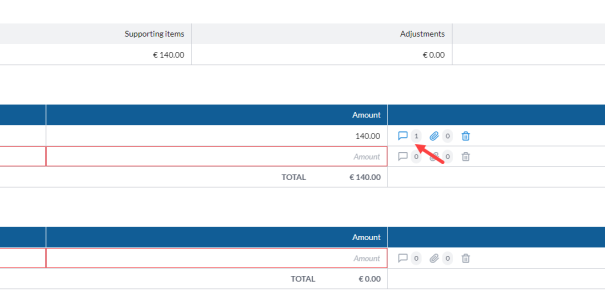

Edit a note or comment
Users can only edit their own and cannot edit the comments made by others.
-
Click
in the row of the comment you want to edit. -
In the Notes pane, find your comment and then, click Edit.
-
Make your edits and click
. -
Click to
 button to exit the Notes pane.
Delete a note or comment
Users can only delete their own and cannot delete the comments made by others.
-
Click
in the row of the comment you want to delete. -
In the Notes pane, find the comment and then, click Delete.
-
Confirm your intent to delete the comments by clicking
. -
Click to
button to exit the Notes pane.
Attach a file to a supporting or adjustment item
Adding a comment or file to an adjustment or supporting item helps you and the Approver communicate clearly and work together efficiently. It is a way to give more details about the adjustment or supporting item.
Note: The size limit for an attachment is 25MB.
-
In the same row as the supporting item or adjustment, click
. -
In the Notes pane, do one of the following:
-
Click
to add a file. Navigate to the file, select it and then, click to save. Your file is saved along with your name and date.
-
drag and drop one or multiple files directly into the comment text box to attach them.
While attaching files, you can:
-
Change the attached file: Click Edit beneath the file. Then, clickX beside the file name to remove it. Next, click
to select a different file and, click to save the updated file. -
Delete the attached file: Click Delete. beneath file. Confirm the deletion by clicking
again.
-
-
Exit the Notes pane. A number indicator appears next to the
icon showing the number of files that have been attached to the task.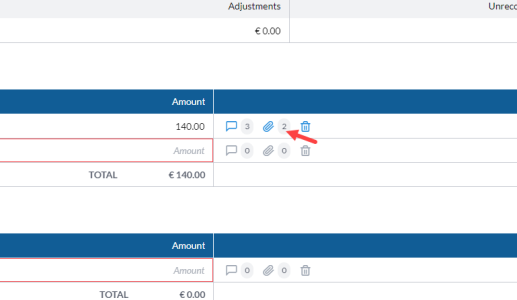

Delete a supporting item
Users can delete supporting items they added themselves, but they cannot delete supporting items added by other users.
Note: When you delete a supporting item, all its associated notes and comments are also deleted.
-
Go to the Supporting Items section of the Accounts Reconciliation details page.
-
Identify the item you want to delete and click
 on that row.
 -
Confirm the deletion by clicking
.
Add an adjustment to task
Making an adjustment refers to correcting discrepancies or errors found during the reconciliation process. After discrepancies are identified, adjustments such as journal entries or corrections to account balances are made to ensure that the accounts are reconciled and accurate.
-
On the Accounts Reconciliation details page, click the Supports tab.
-
Go to the Adjustment items section.
-
In the Date column, click
and pick a date. - In the Amount field, enter the amount. A system message confirms the addition of the supporting item /adjustment. and the Unreconciled difference is adjusted accordingly.
-
Enter the information required in the other fields on the page.
-
Make any additional adjustment in the row below. Otherwise, leave blank.
-
Optionally, do any of the following:
-
Click
to add a comment. See Add a comment .You can input remarks or leave feedback about the task for the Approver. -
Click
to attach notes or upload a file. See Add a file. Note: When you include notes and comments, the corresponding number appears adjacent to each icon.
-
-
After you have reconciled the account with an adjustment, you can click
. An email notification is sent to the Approver in the workflow and the status of the task is updated to Pending Approval. Note: Once a task is submitted, you are prevented from making further edits.
-
Use the
and to navigate through your tasks.
Group adjustments/supporting items
Use the Group By button to organize adjustments and supporting items by Date or Description, to make it easier to review totals and identify related entries. It provides clearer breakdowns of amounts by key categories, making it easier to identify totals for invoices, expenses, or other supporting items.
To group items:
-
Click Group By. The Group By pop-up appears.
-
In the drop-down list, select one of the following options:
-
Date – Groups all items that share the same date. The system sums their values and displays a single total per date.
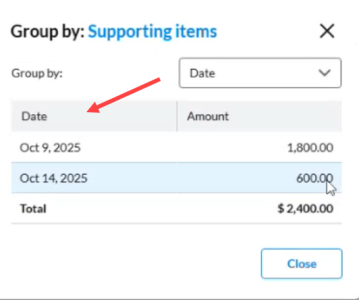
If multiple records exist, the Group By function will automatically separate and total them correctly.
For example:
-
October 9 → $1,800
-
October 14 → $600
-
-
Description - Groups all items with similar description, for example, Invoice, Expense.
If multiple records exist, the Group By function will automatically separate and total them correctly.
For example:
-
Invoice → $1,000
-
Expense → $1,100
-
Internet → $300
-
-

Delete an adjustment
Users have the ability to delete an adjustment that they made. Users cannot delete the adjustments made by other users.
Note: When you delete an adjustment, all its associated notes and comments are also deleted.
-
Refer to the Adjustment items section of the Accounts Reconciliation details page.
-
Identify the adjustment you want to delete and click
on that row. -
Confirm the deletion by clicking
.
Add a note or an attachment at the task level
In addition to adding comments and attachments to supporting and adjustment items, you can also add them at the task level.
On the Accounts Reconciliation details page, do the following:
Add a comment
-
Click the Notes tab.
-
In the Notes pane, enter your comment in the text box, and then, click
 . Your comment is saved along with your name and current date. An indicator displays the number of notes added to the task.
Add an attachment
-
Click
to add an attachment. -
Follow the steps in Attach a file to a supporting or adjusting item for more details.
Preview an attachment
You can open attachments directly from the reconciliation page without downloading them.
To preview a file:
-
Click
the Attachment icon to open the Notes pane. -
Select the file you want to view.
-
Click the Preview button and the file opens in a new browser tab.

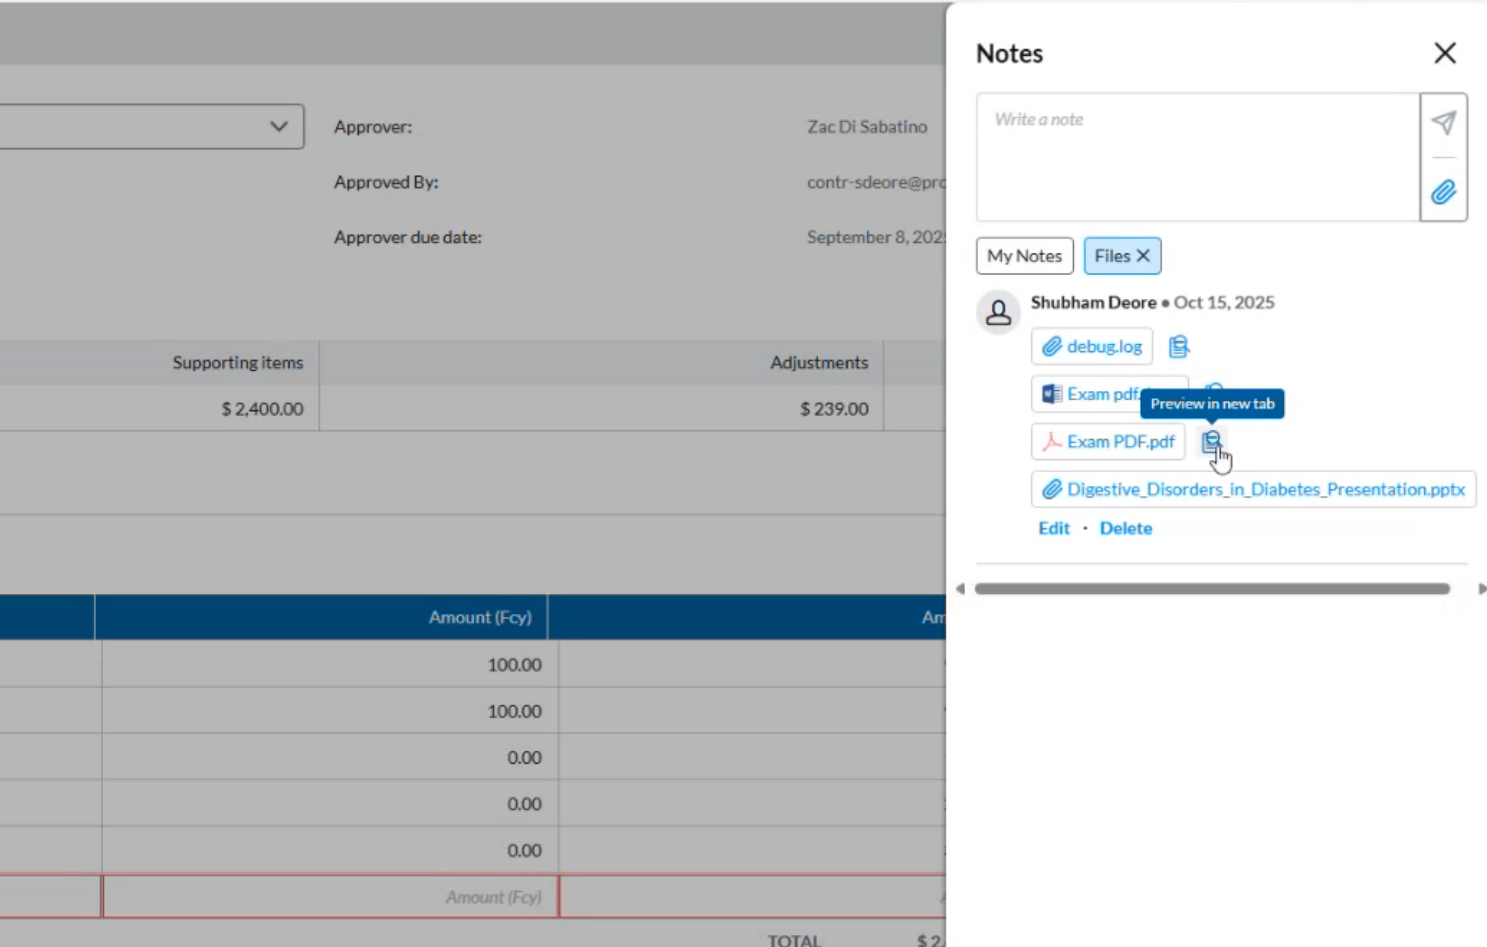
Note: Supported file formats include PDF and image files. Unsupported formats, such as PPT (PowerPoint), will display a message indicating that preview is not available.
Import supporting or adjustment items
-
On the Accounts Reconciliation details page, click
 in the bottom-left corner. The Import Items dialog is displayed.
-
Follow the instructions on the page.
-
When you click the Download link, you will receive an Excel template to use in preparing your data for import.
-
Ensure your data is prepared in accordance with the specified requirements, and then save the file.
-
-
In the Item you want to import field, choose either Supporting items or Adjustment items.
-
In the File field, click
 . Navigate to the CSV file and select it. The name of the selected file appears in the File field.
 -
In the Delimiter field, choose a delimiter to instruct the import process on how to separate data in the form you are importing.
-
Click
 to proceed. The tasks are imported and added to the corresponding section of the page (either Supporting items or Adjustments).

Re-assign a task
If for any reason you are unable to complete a task assigned to you, you can re-assign that task to another user. When you re-assign a task, you will no longer have access to the task.
To re-assign a task:
-
On the Task details page, choose another user from the Preparer drop-down list.
-
Read the message in the Confirm dialog and click
 to re-assign the task to the user you chose.
After the task is re-assigned, it is removed from your To Do list, and the new preparer will receive an email notification to notify that they have a new task available for them.
Approve a task
Applicable to Approvers only.
After a Preparer submits a task, its status changes to PENDING APPROVAL, and the Approver receives an email notification.
As the Approver, you can approve a task as follows:
-
On the task list, select a task with the status PENDING APPROVAL to open the task details.
-
Click
 .
.
The task status changes from PENDING APPROVAL to COMPLETED, and no further edits are allowed.
Reject a task
Applicable to Approvers only.
After a Preparer submits a task, the status of the task changes to PENDING APPROVAL and the Approver receives an email notification.
As the Approver, you can reject a task as follows:
-
On the task list, select a task with the status PENDING APPROVAL to open the task details.
-
Review the task.
-
Click
 .
. -
In the Confirm Rejection dialog, enter a Rejection reason.
-
Confirm your action.
-
An email notification is sent to the Preparer, and the task status changes to REJECTED. The task appears as REJECTED in the task list for all users with access.
-
When a Preparer opens the rejected task, its status immediately changes to IN PROGRESS.
-