Reconcile accounts using schedules
This article explains how to use schedules to simplify and automate the reconciliation of accounts with regular, expected activity — such as prepaid expenses (subscriptions). It covers how to create and import schedule items, and how to apply them when reconciling both individual accounts and account groups.
With schedules, users can reduce manual work by spreading a known starting balance over a defined period, with balances automatically updating each month.
Use a schedule to reconcile an account or account group
-
Navigate to the Account Reconciliation page to view your assigned tasks.
-
Select a task from the list.
-
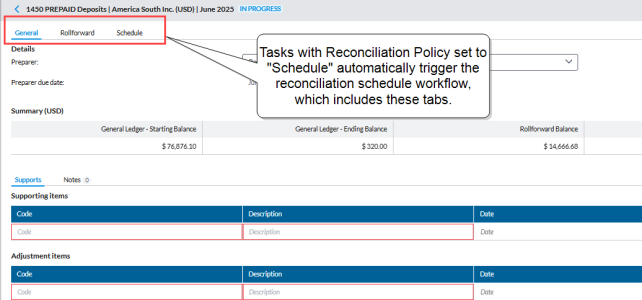
If the task contains an Account or Account Group where the Reconciliation policy = Schedule the system launches the reconciliation schedule workflow.
-
The General tab displays the details of the reconciliation including the account or account group being reconciled, assigned preparer and approver, key dates, etc.
-
The Rollforward tab includes the opening balance, movements (additions or deductions), ending balance.
-
The Schedules tab displays the detailed amortization or transaction schedule associated with the item. It also provides the ability to edit payment amounts or dates.
-
-
Navigate to the Roll forward tab to add a schedule item and set up the amortization schedule for the account or account group.
-
You have the options to:

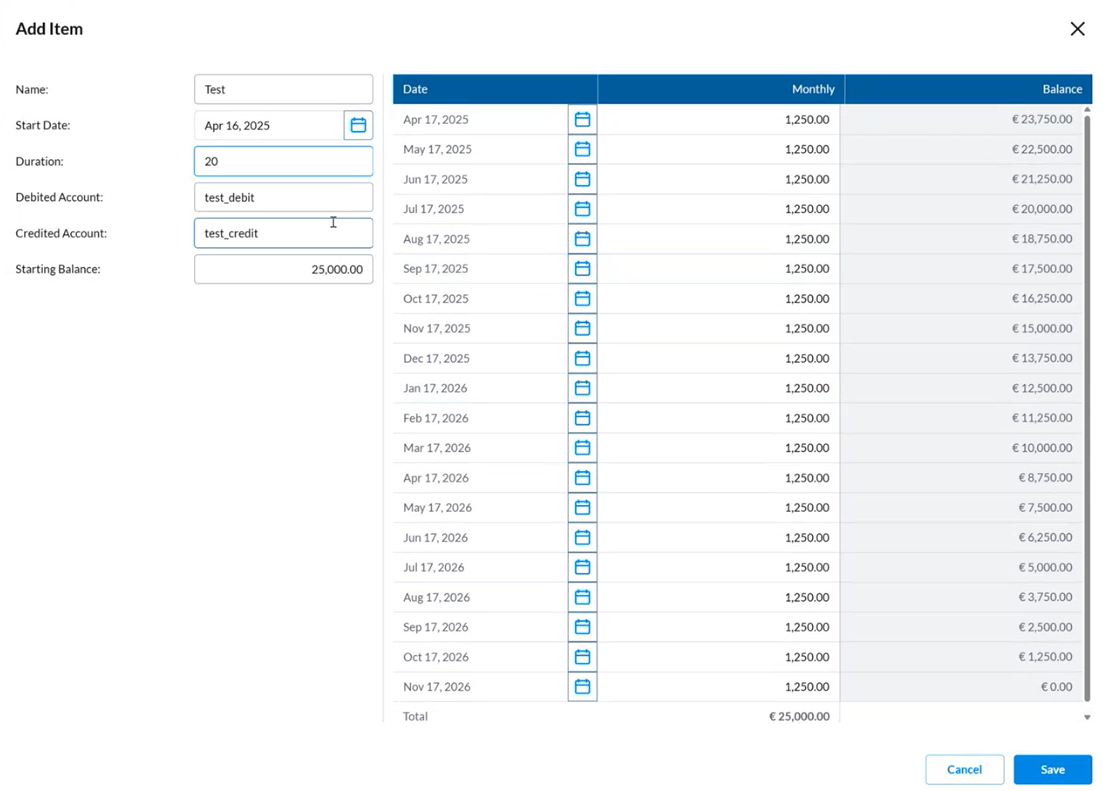
Add a schedule item
-
In the Rollforward tab, click
 to add a new schedule item.
 -
Fill in the mandatory fields:
-
Name – Label for the schedule
-
Start Date – When the schedule begins
-
Duration – Length of the schedule (e.g., 12, 20, months).
-
Debited Account – Account to debit each period
-
Credited Account – Account to credit each period
-
Starting Balance – The total amount to be spread over time
As you fill in the fields, a preview of the schedule is auto-generated on the right.

The amortization schedule automatically generates a series of monthly transactions based on two key inputs: the Start Date and the Duration.
When you enter a Start Date (e.g., April 2025) and a Duration (e.g., 20 months), the application pre-fills a schedule:
-
Payments begin in April 2025.
-
Payments continue monthly, ending in November 2026.
-
The total number of scheduled transactions will match the selected duration (in this example, 20).
-
Import schedule items
Authorized users have the ability to import schedule items in bulk.
-
When you import a schedule:
-
The system automatically calculates the amortization details using the Duration, Start Date, and Starting Balance provided in the import file.
-
These calculated values are populated instantly once the item is added.
-
-
If the imported item already exists:
-
Its schedule will be recalculated and updated based on the new Duration, Start Date, and Starting Balance from the file, replacing any previously set values.
-
-
In the Rollforward tab, click
 to import schedule items.
 -
Click Download, to download the Schedule Item Template and fill in the information required under each column for each schedule item.
-
Ensure your data is prepared in accordance with the specified requirements, and then save the file.
-
When you are ready to import the file into the application, in the File field, click . Navigate to the CSV file and select it. The name of the selected file appears in the File field.
-
In the Delimiter field, choose a delimiter to instruct the import process on how to separate data in the form you are importing.
-
Click
 to proceed.
-
If the import is successful, the items are imported and added to the Rollforward tab.

-
If the import fails (not successful), an error notification is displayed.
-
-
After a successful import, click the Schedule tab to see how the transactions in each schedule item are spread over the duration.

Edit a schedule item
Schedules, whether manually added or imported, are editable.
-
In the Schedule tab, select the schedule.
-
Click
 .
. -
On the Edit Item page, make the desired change:
You can adjust:
-
Payment amounts for any specific month. For example , if you want to pay more in a certain month and reduce other payments, simply increase the amount for that transaction.
The remaining balance will be spread over the remaining months, adjusting each one accordingly
-
Dates if needed to reflect actual transaction timing.
-
Delete a schedule item
Caution: Deleting items will affect data across all scenarios. To avoid impacting roll-forward balances from prior periods, it is recommended to edit the item's end date and schedule rather than delete it.
-
In the Schedule tab, select the schedule.
-
Click
 .
. -
Confirm your action.
Impact of automated schedule reconciliation on account balances
-
Once a schedule is added to an account, the amount used each month is automatically deducted from the Rollforward Balance.
-
When the schedule is fully reconciled (i.e., all amounts have been used), it is automatically removed from the account.
-
Schedule items roll forward like any other Supporting Item . Any items with activity in the next period will continue to appear for the account.
Export journal entries
When you fill out both the Debited Account (typically an expense account) and Credited Account (typically a prepaid asset account) fields in a schedule item, Account Reconciliation can generate a monthly journal entry output file. This file can assist with posting journal entries each period.
To access the journal entry output:
-
Go to
 > Period.
 -
Click the Trial Balance tab.
-
Click
 .
.
For more information, refer to Generate journal entries in the Trial balance article.