Configure and manage match rules
The Match Rules feature allows you to define how the Account Reconciliation application compares and matches transactions between sources, such as General Ledger (GL) and Bank transactions.
Match rule configuration stages
Complete the following stages to configure match rules for a transaction set. Each stage includes the action you take and how Account Reconciliation responds.
-
Open the rules. In the Match Rule column for the transaction set, click Add Rule.
Account Reconciliation opens the rule page for the selected transaction set and displays the preset and custom rules.
-
Manage preset rules. Turn a preset rule on or off. If the rule allows it, adjust the date or amount tolerance.
Account Reconciliation keeps the preset rule name and description unchanged and applies only the rules that are active.
-
Create custom rules. Add a rule, and then enter the name, type, status, and description. Save the rule.
Account Reconciliation checks that the rule name is unique. The Save option is enabled only when all required fields are valid. Account Reconciliation then stores the rule.
-
Filter. Add filters so the rule applies only to the transactions you select.
Account Reconciliation limits the rule to the transactions that meet the filter conditions.
-
Group. For 1:M, M:1, and M:M rules, define the grouping conditions for the GL side and the Bank side.
Account Reconciliation generates a grouping key for each side. It compares the keys to bring related records together.
-
Map. Set the match type and tolerance for Date and Amount.
Account Reconciliation compares the candidate records by using your tolerances and decides whether each pair is a match.
-
Set the order. Move rules up or down to set which rule runs first.
Account Reconciliation saves the order and runs the rules in that order. It removes matched records from later rules.
-
Review changes. Open the audit log.
Account Reconciliation records who made each rule change, when the change was made, and what changed.
The application uses the configured rules during transaction matching. Rules are applied in their saved order, and transactions matched by an earlier rule are not checked again by later rules.
Access match rules
Before you begin
Make sure that:
-
The required transaction set is available on the
 Import Data > Transaction Matching page.
-
You have permission to configure or manage match rules.
-
You know whether you need to use a preset rule or create a custom rule.
To open the Match Rule screen:
-
Go to
> Import Data > Transaction Matching. -
Find the required transaction set.
-
In the Match Rule column, select Add Rule (or click on the existing rules link).
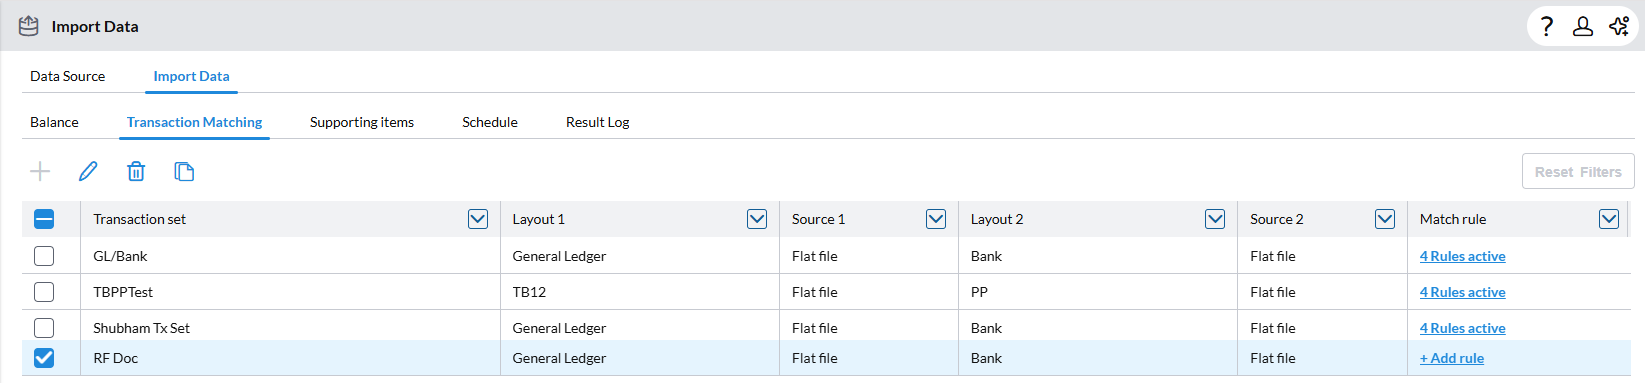
The Match Rule page for the selected transaction set appears.
The Match Rule page
The Match Rule page contains preset and custom rules.
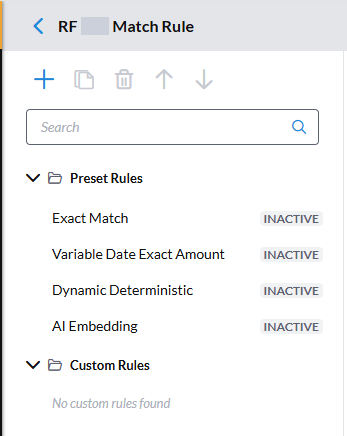
Preset rules
Preset rules are predefined rules that you can use for a transaction set.
-
You cannot edit the Rule Name, Description, and Rule details.
-
You cannot create or delete a preset rule.
-
You can change the rule status between Active and Inactive.
-
Some preset rules allow specific matching conditions to be changed.
Custom rules
Custom rules are created and managed by users.
You can:
-
Create a custom rule.
-
Edit a custom rule.
-
Copy a custom rule.
-
Change its status.
-
Configure filtering and mapping.
-
Delete an inactive or draft custom rule.
Manage preset rules
Preset rules provide predefined matching logic that you can use for a transaction set.
Activate or deactivate a preset rule
-
Locate the required preset rule.
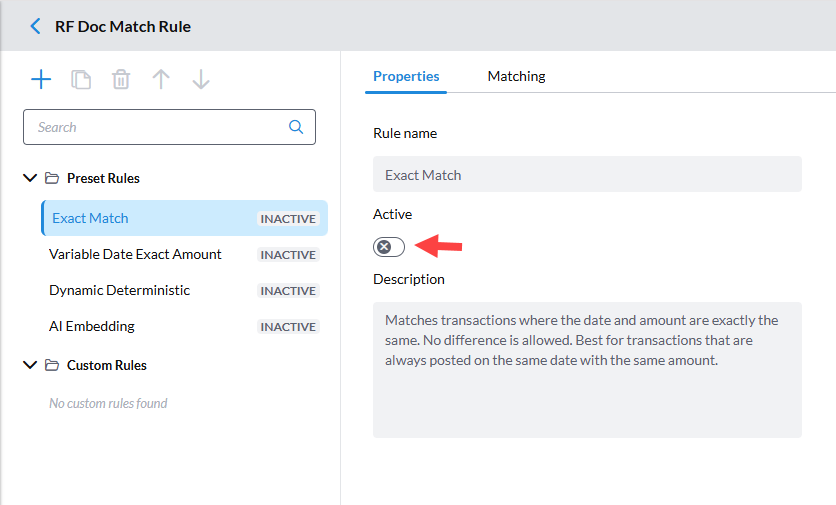
-
Use the status toggle to set the rule to:
-
Active – the rule can be used during matching.
-
Inactive – the rule is not used during matching.
-
Edit matching conditions for a preset rule
Matching conditions, where allowed, can be modified in the Matching tab of the selected rule.
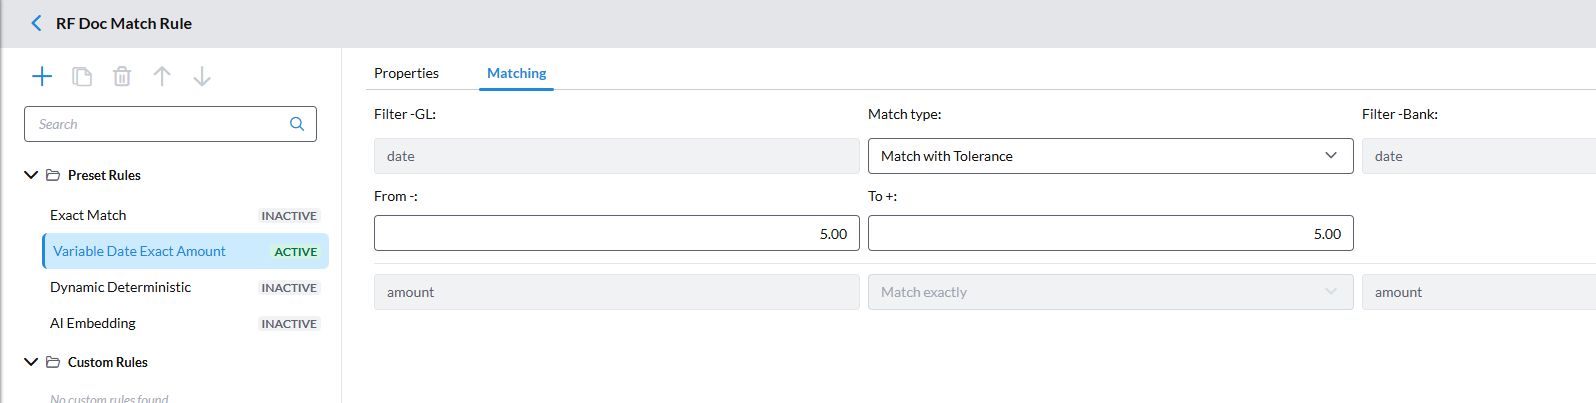
Preset rule details cannot normally be edited. However, specific matching conditions can be changed for the following preset rule types:
Preset rule type Conditions that can be changed Variable Date Exact Amount
Date
Dynamic Deterministic
Date and amount tolerance
AI Embedding
Date and amount tolerance
Example: If the preset rule is Variable Date Exact Amount, you can change the date condition but cannot change the rule name or description.
Note: Preset rule names and descriptions are predefined and remain read-only.
-
Create a custom rule
Use a custom rule when you need to define your own matching logic.
-
Open the Match Rules page for the required transaction set.
-
Select
 to add a custom rule.
-
In the Properties tab, enter the required information:
-
In the Filtering tab, you can configure rule filters to limit the transactions to which a custom rule applies. See Add filters to a custom rule.
-
In the Matching tab, you can define your own matching logic. See Configure matching.
-
Save the rule.
Rule types
Rule types define how records are matched.
| Rule type | Description |
|---|---|
| 1:1 | One transaction is matched to one transaction. |
| 1:M | One transaction is matched to multiple transactions |
| M:1 | Multiple transactions are matched to one transaction |
| M:M | Multiple transactions are matched to multiple transactions. |
The first number refers to the first data source in the transaction set, and the second number refers to the second data source. For example, if you define the first data source as GL and the second data source as Bank when you create a transaction set, a 1:M rule matches one GL transaction to multiple Bank transactions.
Rule Status
| Status | Description |
|---|---|
| Draft | The rule is being configured and is not yet active for matching. |
|
Active |
The rule is available for transaction matching. |
| Inactive | The rule is not used for transaction matching, |
Copy a custom rule
Use Copy rule when you want to create a new rule based on an existing rule.
-
Select the custom rule you want to copy.
-
Select
 . A copy of the rule is created.
-
Enter a new, unique Rule Name. The copied rule must have a different name from the original rule.
-
Review and update the copied configuration as required.
-
Save the rule.
Delete a custom rule
You can delete a custom rule only when its status is Inactive.
To delete a rule:
-
Select the custom rule
-
Set it to Inactive, if necessary.
-
Select
 .
-
Confirm the deletion. The rule is deleted.
Add filters to a custom rule
Use the Filtering tab to limit the transactions to which a custom rule applies.
For example, you can create a filter so that a rule applies only to transactions containing a specific text value or transactions above a specific amount.
To add a filter:
-
Select the custom rule.
-
Open the Filtering tab.
-
Select Add Filter.
-
Select the Data Source.
-
Select the field you want to filter.
-
Select the appropriate condition.
-
Enter the required value.
-
Configure text match options, if applicable.
-
Repeat these steps to add additional filters.
-
To reorder the filters, drag the handle at the left of a filter row up or down. The filter order is stored as part of the rule.
-
Save the rule.
Filter conditions by field type
| Field type | Supported conditions |
|---|---|
|
Text |
Equals, Not Equal, Contains, Starts with, Ends with, Is Empty, Is Not Empty. See Text filter conditions for details. |
|
Numeric or amount |
Equals, Not Equal, Greater Than, Greater than or Equal, Less Than, Less than or Equal, Between |
|
Date |
On, Between |
Text filter conditions
For Text fields, you can use:
| Condition | Purpose |
|---|---|
|
Equals |
Matches the specified text exactly. |
|
Not Equal |
Matches text that is different from the specified value. |
|
Contains |
Matches text containing the specified value. |
|
Starts with |
Matches text that begins with the specified value. |
|
Ends with |
Matches text that ends with the specified value. |
|
Is Empty |
Matches records where the field has no value. |
|
Is Not Empty |
Matches records where the field contains a value. |
Text match options
Text match options normalize text before the application compares it. This helps records match when they differ only in spacing, hyphens, slashes, or letter case.
| Option | Effect |
|---|---|
|
Trim spaces |
Removes extra spaces from the text. |
|
Trim hyphen |
Removes hyphens from the text. |
|
Case sensitive |
Treats uppercase and lowercase letters as different. |
|
Remove spaces |
Removes all spaces from the text. |
|
Remove slashes |
Removes slashes from the text. |
Configure grouping
Grouping combines related transactions so that the application can compare them as a single match. Grouping applies only to 1:M, M:1, and M:M rules. It is not available for 1:1 rules.
Note: For a custom rule that uses grouping, define grouping conditions for both the GL side and the bank side.
-
Select the custom rule.
-
Open the Grouping tab.
-
Click Add Group.
-
Select the grouping type: Exact Field, Reference Based Matching, or Prefix / Substring Matching.
-
Select the Data Source (GL or bank) and the Field.
-
Select the Method.
-
Enter any additional inputs that the method requires, such as a value, keyword, start marker, or end marker.
-
For a text-based method, select one or more Text Match Options.
-
Repeat steps 3 through 8 for the other side.
-
To remove a grouping row, click
. -
Save the configured grouping.
When you define conditions for both sides, the application generates a grouping key for each side internally. You do not see or select these keys. The application compares the keys and brings the records with matching keys together for the mapping step.
Grouping types and methods
| Grouping type | Method | Additional input |
|---|---|---|
|
Exact Field |
As Is Direct Value |
None Value |
|
Reference Based Matching |
Text After Keyword Text Before Keyword Prefix-Based Reference Text Between Two Markers |
Keyword Keyword Prefix to use when generating the matching key. Start marker and end marker |
|
Prefix / Substring Matching |
Starts With Ends With Substring Between Positions Contains Does Not Contain |
Value Value Start Position and End Position to extract a specific value from a reference. Use this grouping condition to extract a value between known numeric positions. Value Value |
Group by invoice number
| Setting | GL side | Bank side |
|---|---|---|
| Field | Description | Reference |
|
Grouping type |
Reference Based Matching |
Exact Field |
|
Method |
Text After Keyword |
As Is |
|
Keyword |
INV- |
Not applicable |
|
Source value |
Payment INV-10025 |
10025 |
|
Result |
Extracts 10025 |
Extracts 10025 |
Both sides produce the same internal key, so the application brings the two records together. It then applies the mapping conditions to decide whether they match.
Configure matching
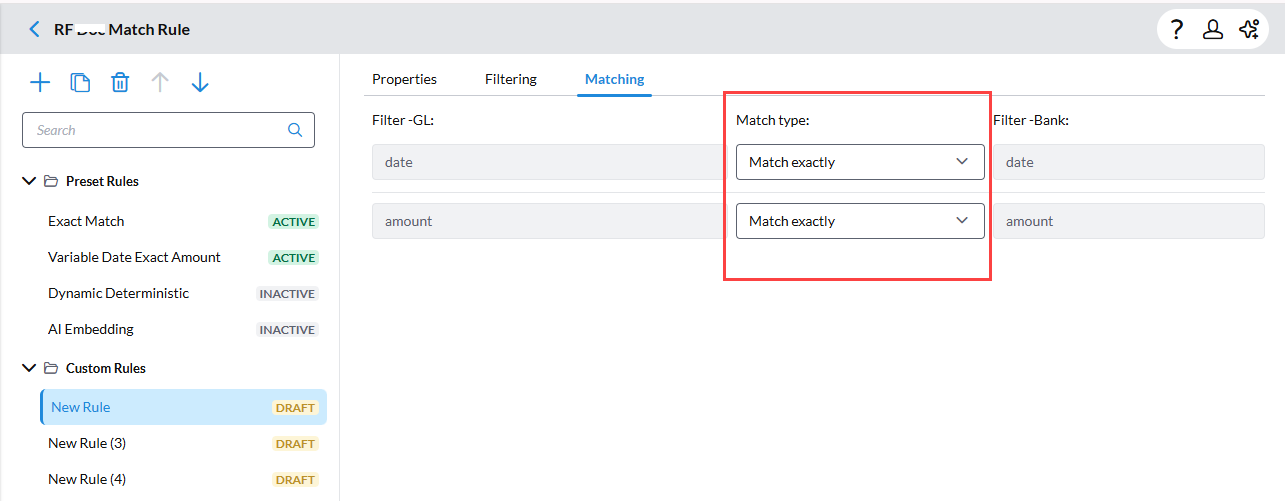
Matching defines how a GL field is compared with a bank field. The Date and Amount mapping conditions are predefined. You can change the match type and tolerance for each one.
-
Select the custom rule.
-
Open the Matching tab.
-
For Date, if you select Match with Tolerance, you must set the tolerance in days. Enter the earlier days allowed in From (-) and the later days allowed in To (+). See Date tolerance for details.
-
For Amount, select the match type: Match with Tolerance or Match with % Tolerance. See Amount tolerance.
-
Enter the tolerance values for the match type that you selected.
-
Save.
Date tolerance
Date fields support Match with Tolerance.
From (-) sets how many days earlier the bank date can be. To (+) sets how many days later it can be.
| GL date | Bank date | Tolerance | Result |
|---|---|---|---|
|
Mar 10, 2026 |
Mar 9, 2026 |
From -1, To +1 |
Match |
|
Mar 10, 2026 |
Mar 12, 2026 |
From -1, To +1 |
No match. The bank date is 2 days later. |
Amount tolerance
Match with Tolerance
Match with Tolerance uses a direct amount difference. From (-) is the amount below the GL amount that is allowed. To (+) is the amount above it that is allowed.
| GL amount | Bank amount | Tolerance | Result |
|---|---|---|---|
|
$1000 |
$1003 |
From -$5, To +$5 |
Match. The allowed range is $995 to $1005. |
|
$1000 |
$1008 |
From -$5, To +$5 |
No match. The bank amount is above $1005. |
Match with % Tolerance
Match with % tolerance uses a percentage range with two values: From - (%) and To + (%). The system applies these percentages to the amount of the first data source transaction to calculate a range of acceptable amounts. A transaction from the second data source matches when its amount falls within that range.
The allowed difference changes for each transaction because it depends on the amount of the first data source transaction. This differs from a fixed tolerance, which uses the same allowed difference every time.
How % tolerance works
In this example, the first data source is GL and the second data source is Bank. The system calculates a range around each GL amount. A Bank transaction matches the GL transaction when the Bank amount falls within that range.
From % sets how far below the GL amount the Bank amount can be.
To % sets how far above the GL amount the Bank amount can be.
Each side also has a maximum amount cap: a maximum decrease and a maximum increase. On each side, the system uses the smaller of the percentage value and the cap.
-
Allowed decrease = the smaller of (From % × GL amount) and the maximum decrease cap
-
Allowed increase = the smaller of (To % × GL amount) and the maximum increase cap
A pair of transactions matches when the Bank amount falls within this range:
GL amount − allowed decrease ≤ Bank amount ≤ GL amount + allowed increase
Because of the caps, a large transaction does not receive a very wide matching range.
Setup: From % is 2, To % is 2, maximum decrease is $150, and maximum increase is $300. The GL amount is $10,000.
Maximum Decrease : 2% of $10,000 is $200. The cap is $150. The smaller value is $150, so the cap applies.
Maximum Increase : 2% of $10,000 is $200. The cap is $300. The smaller value is $200, so the percentage value applies.
The allowed range is $9,850 to $10,200.
| Bank amount | Difference from GL amount | Result |
|---|---|---|
| $10,150 | +$150 | Match (within the +$200 allowed increase) |
| $9,900 | −$100 | Match (within the −$150 allowed decrease) |
| $9,820 | −$180 | No match (beyond the −$150 allowed decrease) |
| $10,250 | +$250 | No match (beyond the +$200 allowed increase) |
The $9,820 row shows the effect of the cap. The difference of $180 is within 2% of the GL amount, but the maximum decrease cap of $150 blocks the match.
For each GL transaction, the system calculates the percentage of the GL amount on each side, compares it with the cap for that side, and uses the smaller value. This produces a range of acceptable amounts. A Bank transaction matches when its amount falls within that range.
Default tolerance and account-level override
A Global Admin sets the default Date and Amount tolerance when creating a custom rule. A Preparer or Approver can override this default for their own reconciliation task. The override applies at the account level. See Set custom thresholds.
Set the rule order
Setting rule order is applicable to custom rules only.
The order of the rules decides which rule gets the first chance to match a transaction.
-
Open the Match Rules page.
-
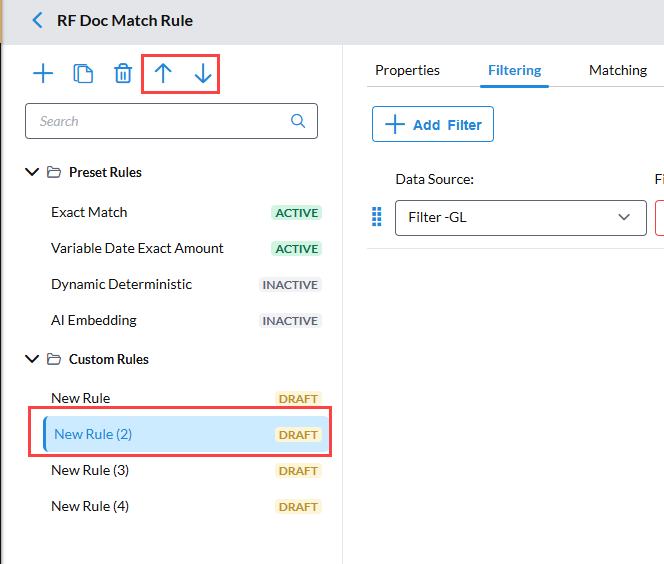
Select the rule (in rule tree) that you want to move.
-
Click Move Up or Move Down.
-
Repeat until the rules are in the order that you want. The order is saved and Matching runs the rules in that saved order.
Audit history
Each rule change, including who made the change, when, and what changed is recorded. Recorded actions are: create, update, copy, status change, delete, and rule reordering