A task is the basic unit in a workflow. Each task accomplishes a single objective, and once completed, moves the workflow forward by a single step; thus a workflow is essentially a series of tasks. Each task is a self-contained unit with its own internal flow among its participants.
To create and manage tasks, you must be assigned the Administrator role. Workflow tasks are initiated on the Workflow Details page.
Before you can add workflow tasks, you must first establish a workflow to which tasks can be added.
Access the Workflow Details page
-
On the navigation menu, click
 . The Workflow page displays established workflows organized by period for the respective entities.
 -
Click on the Entity to which you would like to add the workflow task.
The Workflow Details page displays any existing tasks and their details including Task Name, Status, Preparer, Preparer due date, Approver, Approver due date, and Instruction for each task.You can do the following on this page:
Sort and filter workflow tasks
Sorting and filtering features in the workflow make it easier to manage and edit tasks.
-
Filtering options : You can filter by tasks by the following fields:
-
Task Name
-
Preparer
-
Approver
-
Status
-
-
Sorting options: You can also sort by these fields:
-
Task Name
-
Status
-
Preparer
-
Preparer Due
-
Approver
-
Approver Due
-
After filtering or sorting, click Reset View to return to the default view.
Add a workflow task
Administrators can add workflow tasks to workflow using the following instructions. Workflow tasks can be Account Reconciliation tasks or To Do tasks.
To add a workflow task:
-
Open the Workflow Details page.
-
Click
 . The Add New Workflow Task dialog displays.
 -
Provide the following information:
-
Task type: The type of task, either an Account Reconciliation or a To Do task.
-
Account: The account to which the task will be assigned.
-
Preparer: User responsible for doing the task. The preparer must be specified.
-
Preparer due: Date by which the preparer is expected to complete the task.
-
Approver: User responsible for approving the task. This can be None. The preparer will be able to submit the task without an approval. See Add a non-approval task.
-
Approver due: Date by which the approver is expected to complete the task. If Approver is None, this field will be disabled.
-
Instruction: Any additional information that might help in completing the task.
When rolling forward and creating a Monthly period, the workflow name will be Month End
-
-
Click
 . The task is created and displayed under the account grouping of the selected account.
 Note: New workflow tasks have an initial status of NOT STARTED.
Delete a workflow task
As an administrator, you can delete an Account Reconciliation or To Do task.
-
On the Workflows Details page, select the task or tasks you wish to delete.
-
Click
 .
. -
Click
 to confirm the deletion. The deleted task is removed from the list .It is also removed from the Home page To Do or Account Reconciliation list and the To Do or Account Reconciliation page list. All attachments and comments associated with the task are also deleted.
Import workflow tasks
As an administrator, you can import various workflow tasks into the application using the provided templates. This includes importing both To Do Tasks and Account Reconciliation Tasks. While the process for importing both is similar, there are differences in their respective templates
To import workflow tasks:
-
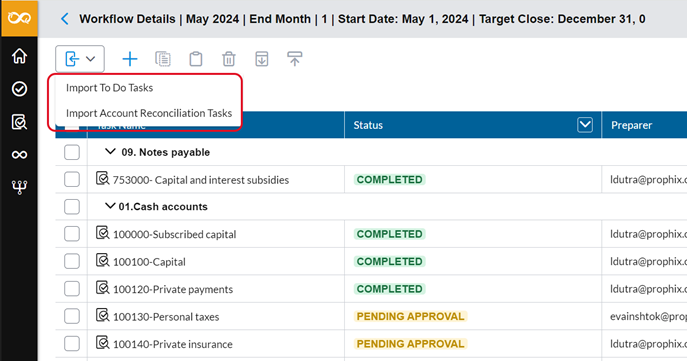
On the Workflow Details page, click
 .
. -
From the list, select either Import To Do Tasks or Import Account Reconciliation Tasks

-
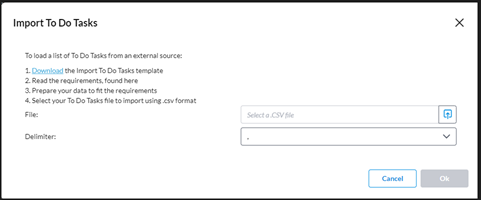
Follow the instructions on the pop-up window displayed.
-
When you click Download, you will receive the template, an Excel file, which includes a pre-populated list of sample tasks and a list of users eligible to be designated as Preparer and Approver.
-
Ensure your data is prepared in accordance with the specified requirements, and then save the file.
-
-
When you are ready to import the file into the application, in the File field, click
 . Navigate to the CSV file and select it. The name of the selected file appears in the File field.
 -
In the Delimiter field, choose a delimiter to instruct the import process on how to separate data in the form you are importing.
-
Click
to proceed.-
If the import is successful, The tasks are imported and added to the Workflow Details page. Tasks assigned to Preparers and Approvers will appear under the relevant categories (To Do or Account Reconciliation) on their My Tasks lists.
Note: For Account Reconciliation, tasks will be created for only those accounts that need to be reconciled.
-
If the import fails (not successful), an error notification is displayed.
-
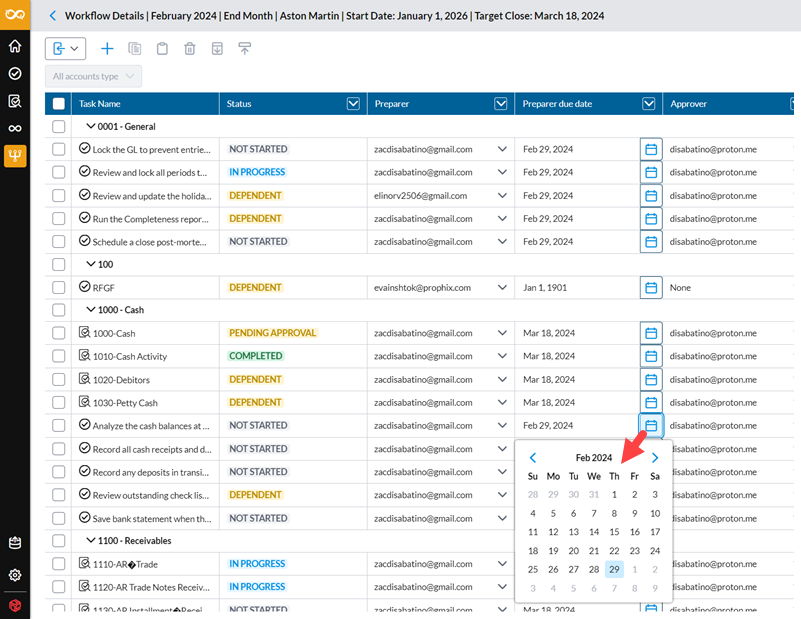
Assign or re-assign preparers, approvers, and due dates
As an administrator, you have the capability to assign preparers or approvers for tasks, as well as the flexibility to switch them if needed. Additionally, you have the ability to set or modify due dates for these tasks.
-
On the Workflow Details page, locate the task for which you want to manage the approver, preparer, or due dates.
-
You have these options:
-
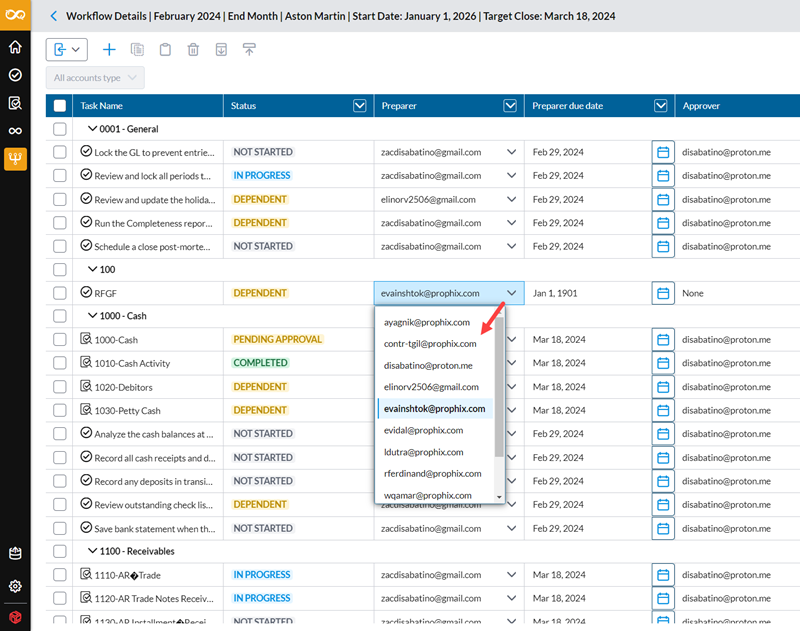
To assign or switch preparer or approver, go to the Preparer or Approver field, click
 and select another user from the list.
-
To assign or modify a due date, go to the due date for the approver or preparer, click
 , and then select a date.
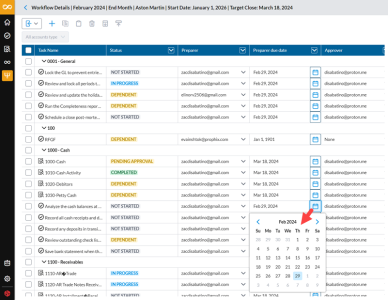
-
Add non-approval task
You can create a task without assigning an approver. When no approver is assigned, the preparer can submit the task upon completion, and the task status will change to Completed upon submission. In contrast, tasks with assigned approvers will have a status of Pending Approval when completed and submitted by preparers, requiring approval before they can be marked as Completed
-
Follow the steps in Add a workflow task. New workflow tasks have an initial status of NOT STARTED.
-
In the Approver field of the Add New Workflow Task pop-up window, select None.
-
Click
. The task is created and displayed under the account grouping of the selected account.
Monitor workflow task
The status of a task helps users to manage their tasks and administrators to monitor the workflow.
| Status | Description | What next? |
|---|---|---|
| NOT STARTED | Work has not started on the task. | Assigned user needs to interact with the task. |
| DEPENDENT | Task depends on the completion of another task, known as its predecessor | Assigned user must complete the predecessor task before they can work on the dependent task. |
| IN PROGRESS |
Task has been started but not completed. |
Assigned user submits task for approval. |
| Task has been submitted, is in the approval process, but reopened by the Preparer. | Task is returned to the Preparer for edits and removed from the Approver’s queue. | |
| PENDING APPROVAL |
Preparer has submitted the task but it is yet to be approved by the Approver.
|
Assigned user submits task for approval. The approver approves or rejects the tasks, possibly adding comments.
|
| Approver has reopened a task that was previously COMPLETED. | Task is returned to the Approver’s pending list for re-approval. | |
| COMPLETED | The task has been completed successfully. |
|
Adjust dates for period rollovers
Adjusting your dates to accommodate period rollovers is crucial, as it allows you to reuse your workflows for subsequent periods.
Dates vary from month to month and may not consistently fall on the same days. For example, a date might fall on a weekday (work day) in one month but on a weekend in another. If tasks start on weekends when no one is available to work on them, it can disrupt the workflow.
As an administrator, you can set your workdays to ensure that all tasks start and end exclusively on weekdays. This helps maintain workflow efficiency by preserving the same duration between the dates from the copied period. Consequently, when workflows are rolled over from one period to another, the start and due dates for preparers and approvers remain relatively consistent.
-
On the Workflow Details page, click
 .
. -
On the Settings window, choose your workdays.
-
Click
. The workflow is now configured for repeated use without requiring any resetting of due dates when it is copied or rolled over to the next period.
Download workflow task details to Excel
-
On the Workflow Details page, click
 . The file is generated and ready for you to open or download.
 -
Download and save the file. All tasks (To Do and Account Reconciliation) associated with the specific workflow is exported into an Excel file. The exported data matches what is displayed in the Workflow grid, meaning the file will contain all tasks currently shown.
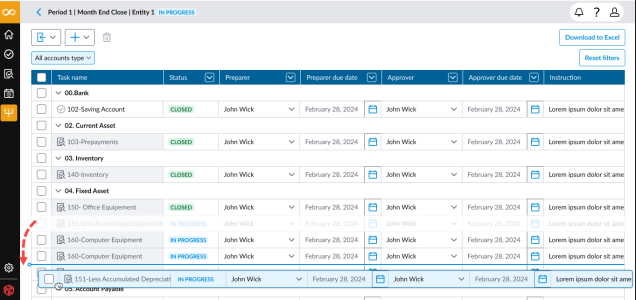
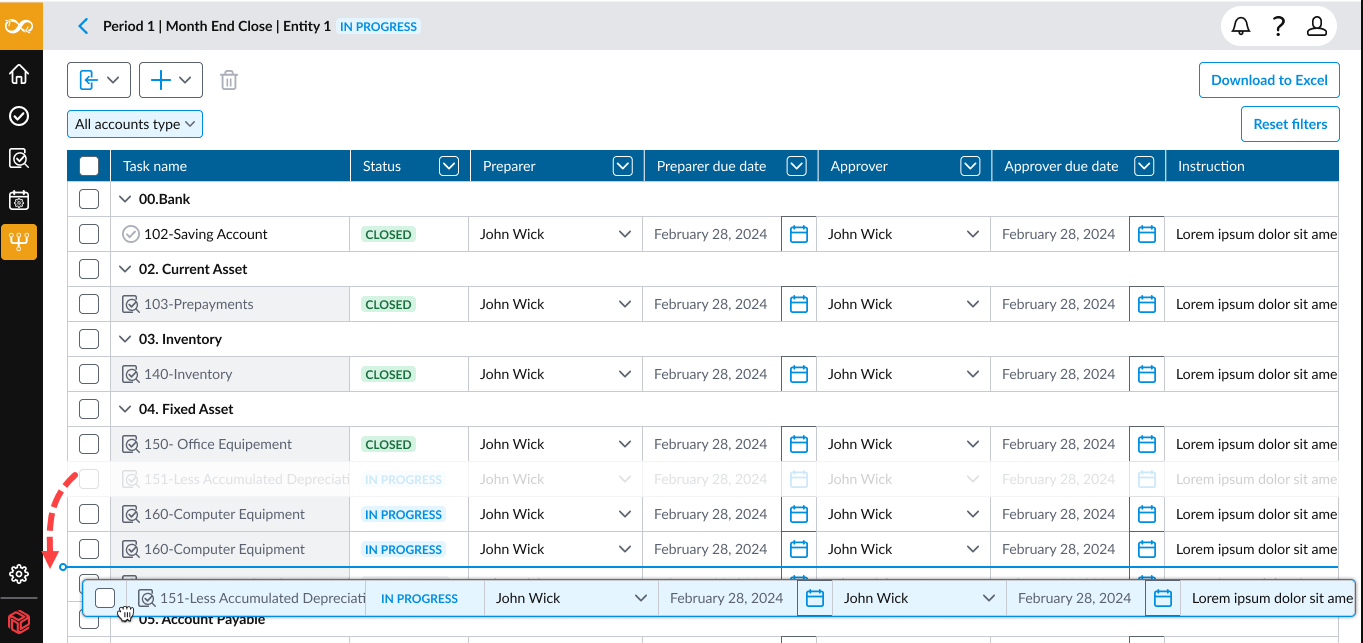
Reorder tasks within an Account type roll-up
Admins and Global Admins can now easily change the order of tasks within an Account Type roll-up when editing a workflow. This applies to both AR and To Do tasks.
Note: You cannot drag and drop tasks within different account groups.
Caution: There is no undo option, so make sure you are re happy with the new order before moving on.
-
In the Workflow Details page, navigate to the workflow you want to edit.
-
Locate the Account Type roll-up.
-
Click and hold the task you want to move. A visual indicator shows that the item is being dragged.
-
Drag the task to the desired position in the list. A visual hint appears to indicate where the task will be placed.
-
Release the task to drop it into the new position. A notification confirms that the task order has been updated.
Note: After reordering tasks in the workflow using drag and drop, all users (Users, Admins, and Global Admins) will see the tasks appear in the same updated order when viewing them in To Do Overview, AR Overview, or My Tasks.
When reordered tasks are exported via the button, the To Do and AR Tasks will maintain their current order. For example, if tasks appear as 2-1-3-4 for a specific Account Type in the UI, that same order is reflected in the template.
Reorder tasks in an import file
You can reorder To Do and AR tasks by editing the import template.
-
To change the order, update the task rows directly in the CSV file before importing. This is useful when working with many tasks.
-
After reordering (e.g., moving Task 3 to the top), import the updated file. The task order will be reflected in the UI.
-
If tasks are added or moved between groups, the import maintains the task order within each Account Type group.